Create a Heat Distortion Post Process Effect inside of UDK
This tutorial will teach you how to make a Post Process material that samples screen Depth and distorts things in the distance quite like heat.
You can also use this same effect for underwater environments.
You can also use this same effect for underwater environments.

So we begin in Photoshop, we need to render some basic black and white clouds which are going to be the base of our distortion, make a new 512x512 sized image and go to Filter > Render> Clouds. Make sure your color palette is black and white.
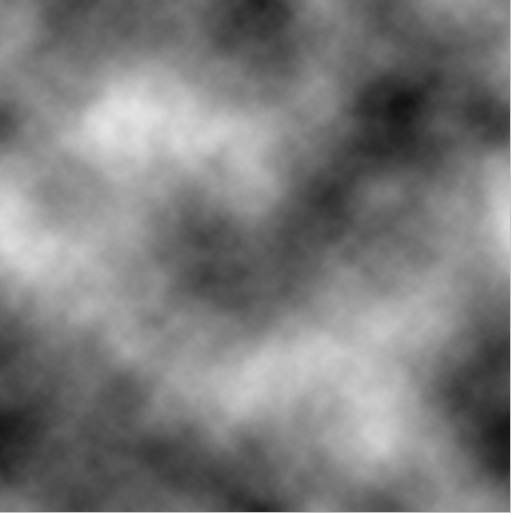
Don’t have Photoshop? Download these clouds here!
Import the cloud texture into your game content package or level.
So once you’ve imported the clouds into your package we can begin by right clicking in the content browser and making a New Material.
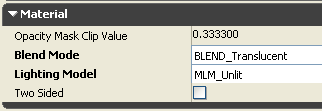
We will begin by setting the material up to be Translucent and Unlit.
Now we begin work on the clouds, drag in two copies of the clouds we just imported and add two Panners, two Rotators and a single TextureCoordinate.
Plug the TexCoord into both of the Rotators coordinate channels, then plug the rotator into the Panners coordinate channel and then plug the panners into the texture samples UV’s.

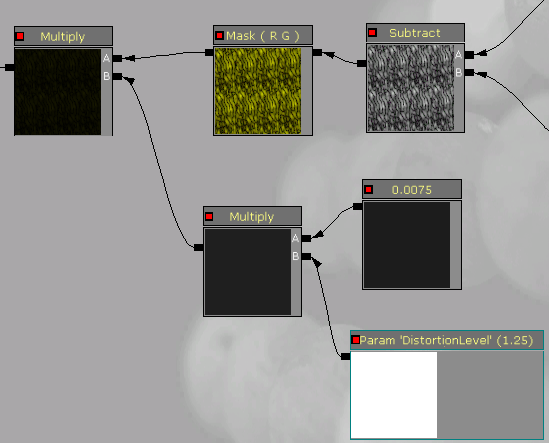
Now our clouds will be spinning slowly in circles, we need to add a Subtract and a ComponentMask, plug both the texture samples into the Subtract and plug the subtract into the mask.
Now we’re going to multiply this with a distortion scalar which we can edit later via Material Instance, add two Multiplies, a Constant and a ScalarParameter.
Plug the Mask into the A channel of the first multiply and the second multiply into the B channel of the first, now we’re going to multiply the constant by our scalar parameter which we can then scale the distortion amount from.
Name the Scalar Parameter ‘Distortion Scale’ for reference and we can move on to the next step.
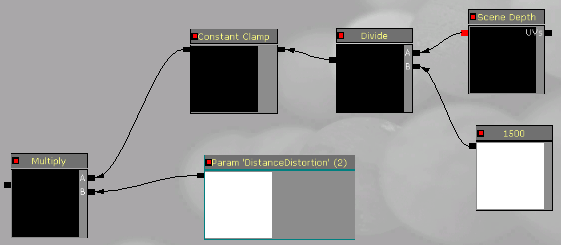
Now we’re going to move over to the Scene side of the material, this section will gather the relevant scene depth info and make it so when we set this up in the distance of your view there will be distortion, but at a range we will set there will be no distortion, it will blend between our preset distance and distorted distance.
Add a SceneDepth node and a Constant with a value of 1500 and we’re going to divide these and plug it into a ConstantClamp then we’re going to Multiply the SceneDepth math by a Scalar Parameter, name the scalar parameter ‘Distortion Distance’ for reference and set its default constant to 2.
Next we’re going to tie the distortion into into the screen depth and bring them together with a screen position and a mask, Multiply the clouds multiply node with the scene depths multiply node and add a ScreenPosition node to a ComponentMask and Add that to the Multiply that ties the Clouds to the Scene Depth.
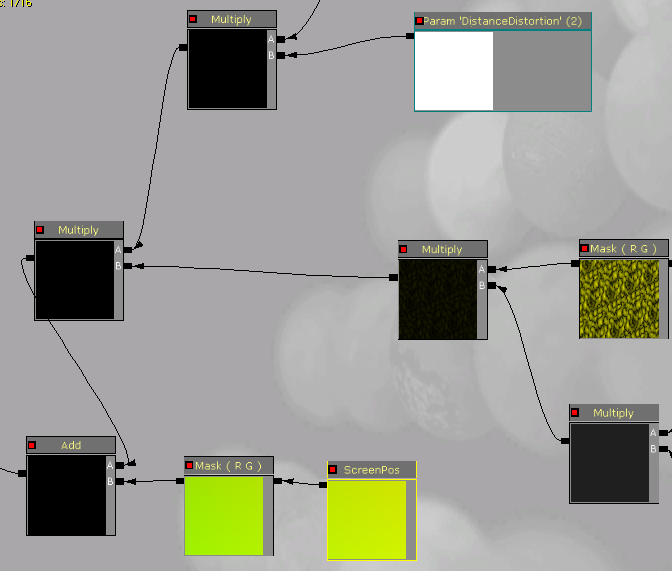
Finally we’re going to add a SceneTextureSample plug this into the materials Emissive Channel and plug in the Add to its UV channel and our texture is ready for the last stage of the effect.

Apply the changes to our material and once its all done Right click it and make a MaterialInstance of it and this is what we’re going to use in our PostProcessEffect. Right click in your package in the content browser and make a New PostProcessChain.
Once made you can open the chain up in the Unreal Post-Process Editor and add a new MaterialEffect, this is where we’re going to add our texture we just made.
You can go a few steps further with it and add an UberPostProcessEffect and up the bloom scale and scene colors or even add a DoF effect behind the heat distortion.

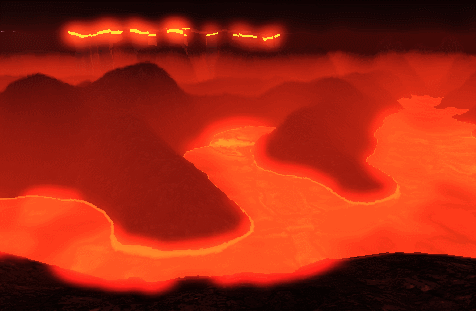
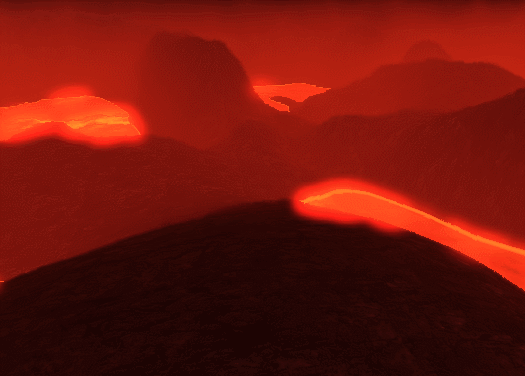
This material will not distort anything close up to the parameter you set as demonstrated in the picture above, the rocks that are close to you will not be distorted but slightly further out the lava and distant objects will.
You can further adjust and tweak this material via the Material Instance you made but you should apply the post process chain inside the world properties first so you can see the visual changes that are being made.
By Haydon ‘Billa’ Jamieson
"Now our clouds will be spinning slowly in circles, we need to add a Subtract and a ComponentMask, plug both the texture samples into the Subtract and plug the subtract into the mask."
ReplyDeleteHow do I connect the texture samples to the subtract A and B?